Breaking Down Swift Take-Home Challenge: Part 1 - Network
I am an iOS developer developing the best-rated banking app in Germany from before it went beta 🇩🇪 I focus on all the aspects of software engineering, from writing good code to developing scalable architectures to enhancing UX and other not-so-much-code-related things. I also put a lot of attention to establishing communication flows and creating a great atmosphere. One of my other focuses is providing a constant flow of cats and memes all over the place. I think in this part I succeeded the most.
Intro
What is the main task of the iOS developer? Correct, doing the tech challenges for the new jobs!
I was interviewing candidates for the iOS developer position. A part of our interviewing routine was the take-home code assignment. Initially, I thought that this part was simple and anyone who tried at least a bit would be able to show us a good result. I could not be more wrong.
In this series of articles, we'll solve a sample take-home coding challenge in Swift. We will talk about an architecturally good yet simple solution. We will see which decisions are good and which might lead to problems. I will also point to important things that I interviewer may pay attention to.
Each article will represent the implementation and way of thought for each commit(s) from this git project. The list of commits and articles:
Implementing the network layer. This article. Main commit.
Implementing location. WIP, already working on it!
Implementing the UI. WIP, stay tuned!
List of things to notice when doing any take-home assignment. WIP, I hope I ever get here :D
I will mark hints that are useful in any interview with 💡 sign. The technical part itself will be fairly simple fitting everyone, from Junior to Senior level.
As with any software piece, this is not the only solution. Neither is my opinion the one representing all the interviewers' approaches. I will be glad to hear your feedback. The resulting project will show what I as an interviewer consider a robust yet minimal setup.
Now I am done with the foreword. I hope you enjoy accompanying me on this journey!

Task at Hand
The take-home assignment is in a gist here. It was provided by my good friend Mohsen Biglari.
TLDR; the app needs to fetch some weather data for a specific location and display it. The location should be updated every ten seconds.
Planning a Roadmap
We need to take at least those three steps:
Request weather for location;
Show location, temperature, and weather type;
Change location every ten seconds.
💡 The point of a tech challenge is to demonstrate the result in a given time. It might be tempting to develop more than asked but it is the focus that matters. I'd rather work with a person who can plan and perfectly implement one feature than a person who brings five features, each of which is an unfinished mess. We can add more functionality later on when we are done with the core.
Getting Started
We depend on the 3rd party API, Open-Meteo. On the homepage, there is a request example. Note, that the coordinates are passed in the query arguments. Let's strip the request and see what it gives us. Execute this line in the terminal:
curl "https://api.open-meteo.com/v1/forecast?latitude=52.52&longitude=13.41¤t_weather=true"
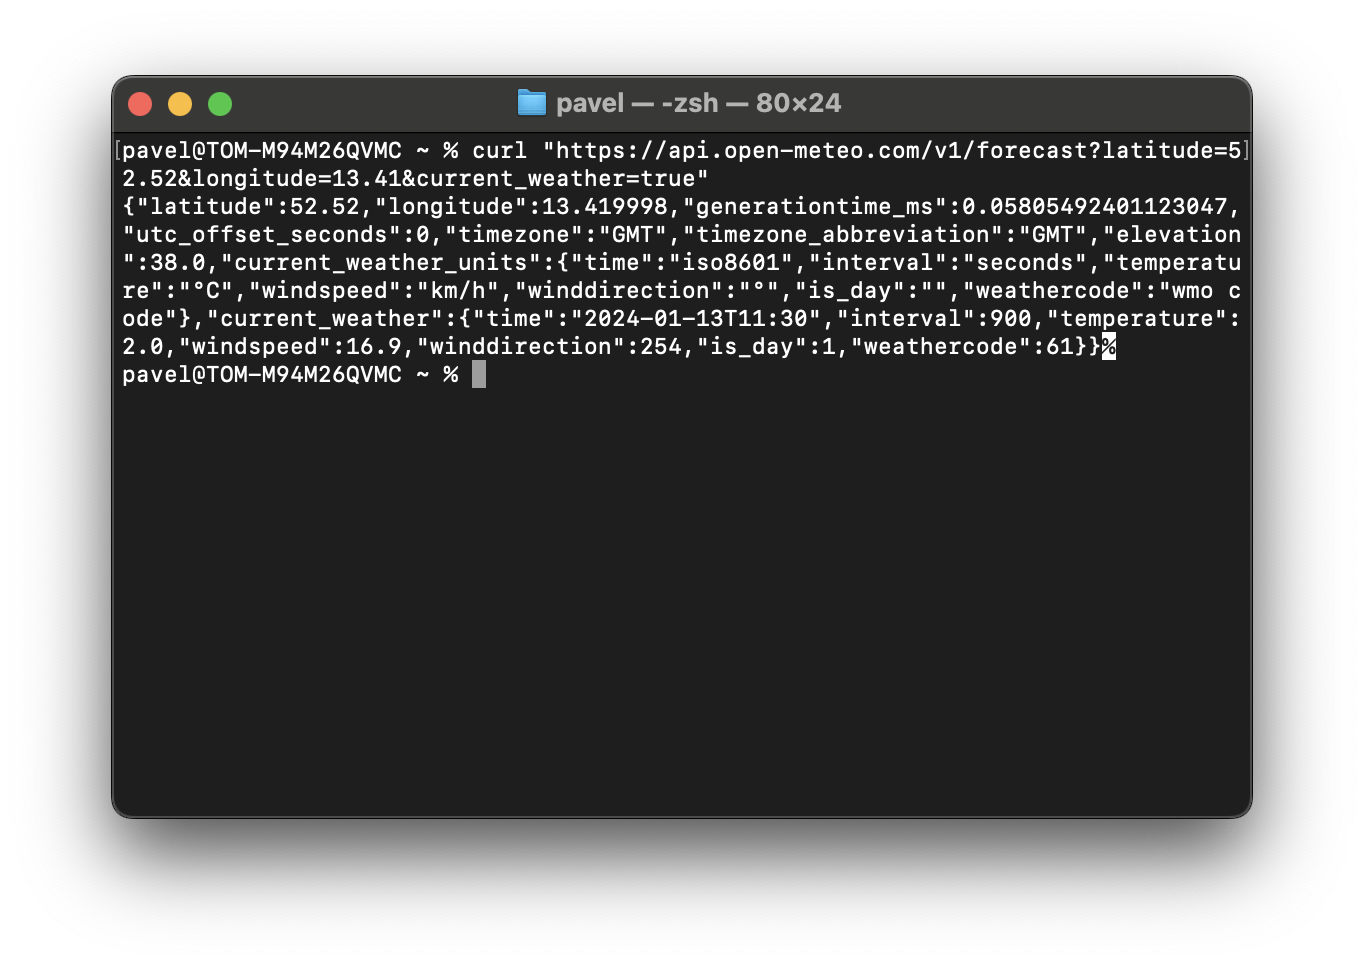
Format it to see what we get via any JSON formatter:
{
   "latitude":52.52,
   "longitude":13.419998,
   "generationtime_ms":0.05805492401123047,
   "utc_offset_seconds":0,
   "timezone":"GMT",
   "timezone_abbreviation":"GMT",
   "elevation":38.0,
   "current_weather_units":{
      "time":"iso8601",
      "interval":"seconds",
      "temperature":"°C",
      "windspeed":"km/h",
      "winddirection":"°",
      "is_day":"",
      "weathercode":"wmo code"
   },
   "current_weather":{
      "time":"2024-01-13T11:30",
      "interval":900,
      "temperature":2.0,
      "windspeed":16.9,
      "winddirection":254,
      "is_day":1,
      "weathercode":61
   }
}
I see temperature and weather code fields there. That's exactly what we need! Now let's fetch the data in the app.
Implementing Network
Models
Every journey starts with a small step. Create a project. I call it WeatherCat because I like cats.

The hardest part is done. Now we just need to fetch the data. For the basic implementation we only need two fields, temperature and weathercode. We will decode them into a DTO.
💡 Keep the data object as slim as possible, do not decode data you don't need. It improves readability, anyone can understand the capabilities of the app by looking at the model. Also, if API changes and some unused property is no longer delivered, no changes are needed – we've never parsed the runaway!
struct WeatherDataDTO: Decodable {
    let currentWeather: CurrentWeather
}

extension WeatherDataDTO {
    struct CurrentWeather: Decodable {
        let temperature: Double
        let weatherCode: Int

        enum CodingKeys: String, CodingKey {
            case temperature
            case weatherCode = "weathercode"
        }
    }
}
Splitting network data (DTOs) and domain data (our models) is good practice. So let's create a separate domain model:
struct WeatherData {
    let temperature: Double
    let type: WeatherType
}

extension WeatherData {
    enum WeatherType {
        case clear, partlyCloudy, fog, rain, snow, thunderstorm, unknown
    }
}
I am not a fan of the "Data" suffix in the naming, it does not bring new information. But calling the object just Weather is too much. If there is a better idea in the future, we can change it then.
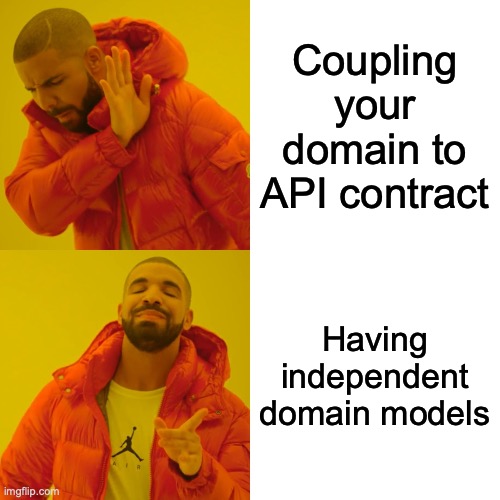
💡 Why is it important to have domain models independent from network models? There are two main points:
We can form the model the way we like. In our example – use clear enum values instead of mysterious
Intweather code;If the network model changes, for example, the weather code turns into a
String, our domain model will remain unchanged. Only the conversion from the network to the domain model is affected. It is kinda following SRP – our domain model has only one reason to change and it is not a change in the API contract.
Speaking of the conversion, we need a Converter to parse DTO into the domain model! The conversion values originate from the docs. I clamped some weather types together. There is no need to distinguish between drizzle and rain etc.
enum WeatherConverter {
static func weatherData(from dto: WeatherDataDTO) -> WeatherData {
.init(temperature: dto.temperature, type: weatherType(from: dto.weatherCode))
}
private static func weatherType(from weatherCode: Int) -> WeatherData.WeatherType {
switch weatherCode {
case 0:
return .clear
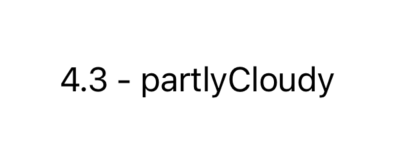
case 1, 2, 3:
return .partlyCloudy
case 45, 48:
return .fog
case 51, 53, 55, 56, 57, 61, 63, 65, 66, 67, 80, 81, 82:
return .rain
case 71, 73, 75, 77, 85, 86:
return .snow
case 95, 96, 99:
return .thunderstorm
default:
return .unknown
}
}
}
Network client
Now we need to fetch the data! I always start with protocols. It's good to define the borders between layers right from the start.
💡 Borders serve many good purposes. First of all, they show the interviewer how cool you are 😎 Secondly, they make it simpler to evolve the project in the future without mixing responsibilities. It's a topic for at least a book and I recommend the one from Robert C. Martin, "Clean Architecture: A Craftsman's Guide to Software Structure and Design". It's worth a read, re-read, and re-re-read.
What are we expecting from a network service? That it executes some request and either returns what we have requested, or throws an error. However, I normally avoid throwing and return a Result object instead. This way we have strongly typed errors.
protocol NetworkRequesting {
    func request() async -> Result<SomeReturnType, SomeError>
}
SomeReturnType is WeatherData, we agreed we do not want to see DTOs anywhere outside of the network layer. For error, we can define a custom type:
enum NetworkError: Error {
    case network, noInternet, timedOut
}
Then the protocol takes the following form:
protocol NetworkRequesting {
    func requestWeatherData() async -> Result<WeatherData, NetworkError>
}
Time to provide some implementation. It's super standard code without any wit but with some issues incorporated ;) can you spot them?
💡 Trying to find errors in the code, and performing a code review together, is another, somewhat less stressful way to test applicants. Even though this article is not about that type of challenge, take a moment and analyze what could have been done better. We'll touch upon some points at the end of this article.
final class NetworkRequester: NetworkRequesting {
private var decoder: JSONDecoder = {
let decoder = JSONDecoder()
decoder.keyDecodingStrategy = .convertFromSnakeCase
return decoder
}()
func requestWeatherData() async -> Result<WeatherData, NetworkError> {
do {
let urlString = "https://api.open-meteo.com/v1/forecast?latitude=52.52&longitude=13.41¤t_weather=true"
let request = URLRequest(url: .init(string: urlString)!)
let (data, _) = try await URLSession.shared.data(for: request)
let weatherDataDTO = try decoder.decode(WeatherDataDTO.self, from: data)
return .success(WeatherConverter.weatherData(from: weatherDataDTO))
} catch {
return .failure(NetworkRequester.convert(error: error))
}
}
private static func convert(error: Error) -> NetworkError {
guard let urlError = error as? URLError else {
return .network
}
switch urlError.code {
case .notConnectedToInternet:
return .noInternet
case .timedOut:
return .timedOut
default:
return .network
}
}
}
Testing out
I like seeing gears turn. Let's do it quick and dirty! Take the automatically created ContentView and request the data directly from there
struct ContentView: View {
    @State private var weatherData: WeatherData = .init(temperature: 0.0, type: .clear)

    var body: some View {
        let text = "\(weatherData.temperature) - \(weatherData.type)"
        Text(text)
            .task {
                guard let weatherData = try? await  NetworkRequester().requestWeatherData().get() else {
                    return
                }
                self.weatherData = weatherData
            }
    }
}
And here is the result. That's the moment of fame I will tell my grandchildren about!
💡 There are different types of code. The code above is intended to live only for several minutes – we will not even commit it to avoid making the git history dirty. But in general, if code lives longer and will represent your coding skills during the interview, it should be as clean, understandable, and efficient as possible. And one pillar of efficiency is automated tests.
Testing properly
We can always validate with our bare eyes if the app correctly processes the data we get from the network. But it takes progressively more time when our codebase grows. So let's write automated tests
When writing the unit tests, we cannot rely on the network. It can fail due to an internet hiccup, provider outage, or a new Carrington event. Such nonsense should never prevent us from running the unit tests though! To achieve independence, we need to take two steps:
Abstract away the part where we request the network. In our case, it is one function,
URLSession.shared.data;Inject the abstraction into the Requester from outside so we can return any result we like.
The to-be-abstracted method:
public func data(for request: URLRequest, delegate: (URLSessionTaskDelegate)? = nil) async throws -> (Data, URLResponse)
We simply copy it and omit the part we don't need – the delegate. The protocol for our abstraction will look this way:
protocol HttpRequesting {
    func data(for request: URLRequest) async throws -> (Data, URLResponse)
}
To avoid creating extra entities, we can make URLSession directly conform to the protocol:
extension URLSession: HttpRequesting {
    func data(for request: URLRequest) async throws -> (Data, URLResponse) {
        try await data(for: request, delegate: nil)
    }
}
Now, we modify the NetworkRequester so it uses abstraction instead of a particular implementation for requesting the data from the network:
private let httpRequester: HttpRequesting

init(httpRequester: HttpRequesting = URLSession.shared) {
    self.httpRequester = httpRequester
}

func requestWeatherData(latitude: Double, longitude: Double) async -> Result<Weathe
    // ...
            let (data, _) = try await httpRequester.data(for: request)
As easy as petting a cat!
Back to the tests. We want our Requester to get some data but we want to control the data itself. Then we can create a simple stub. Its only responsibility is to return the result:
final class StubHttpRequester: HttpRequesting {
    var stubbedResult: (Data, URLResponse)!

    func data(for request: URLRequest) async throws -> (Data, URLResponse) {
        stubbedResult
    }
}
Finally to the tests! I won't share the entire code, you can always find it in the GitHub project. Here is one test to demonstrate the approach:
final class WeatherRequesterTest: XCTestCase {
    // MARK: - Dependencies -

    private var sut: WeatherRequester! // System Under Test
    private var httpRequester: StubHttpRequester!

    // MARK: - Setup -

    override func setUp() {
        self.httpRequester = .init()
        sut = .init(httpRequester: httpRequester)
    }

    func testRequestWeatherDataSuccess() async {
        // given
        httpRequester = StubHttpRequester() // Create a stub class
        // Set up the response. I have a local file where I store a sample of response
        httpRequester.stubbedResult = (JsonLoader.json(from: "WeatherResponse")!, URLResponse())
        sut = WeatherRequester(httpRequester: httpRequester) // Inject the stub

        // when
        let weatherDataResult = await sut.requestWeatherData() // get the result

        // then
        // validate that the result was parsed correctly
        XCTAssertTrue(weatherData.temperature == 2.0, "Temperature is incorrect")
        XCTAssertTrue(weatherData.type == .rain, "Weather type is incorrect")
    }
}
💡There are many approaches to stubbing and testing in general. This one is rather straightforward and described in more detail byJohn Sundell.
Improving code and fixing NetworkRequester
The task is completed. Code in general is rarely perfect and the code in this article is no different. That's why it is critical to review and improve it. Let's dissect it and finally answer the question of issues planted in the original implementation!
💡 Do not underestimate the use of the code improvements. We are the ones benefiting the most from it. The maintenance part – when we work with the existing code – is way longer than writing new code. It's better to spend half an hour on refining the code now than suffer from bad code for tens of hours. A bit of empathy towards thefuture us.
Rename NetworkRequester into WeatherRequester
The original name was way too ambiguous. It is better to be specific. If we have WeatherRequester we know that for requesting images or user profiles we will create another Requester type. Less thinking for the future us! ✅
Reorder files
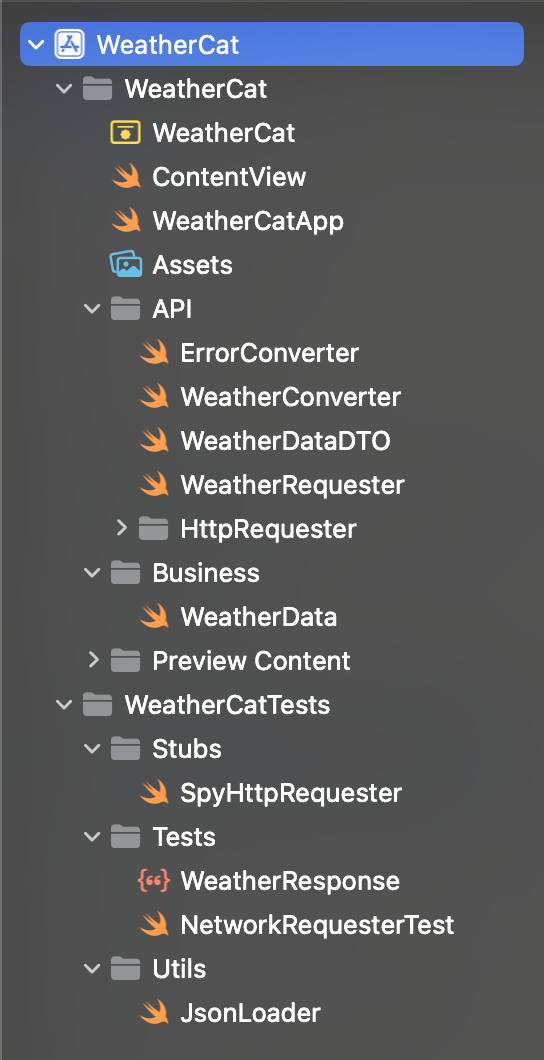
You might call me a nerd, but splitting everything into folders and ordering them is extremely satisfying. It will also help the future us to find things faster. By spending time now we are saving time! ✅

You might come up with a different structure. For example, I don't particularly like the folder named Business. And the app files floating at the root. But it's a good first step and the main thing is consistency. Especially I like how consistently I forgot to rename the test class 🐈
Extract error mapping into a separate entity
I put it into a separate commit. The function convert is universal enough to be used by multiple Requesters. So why keep such a gem privately?!
enum ErrorConverter {
    static func convert(error: Error) -> NetworkError {
        guard let urlError = error as? URLError else {
            return .network
        }
        switch urlError.code {
        case .notConnectedToInternet:
            return .noInternet
        case .timedOut:
            return .timedOut
        default:
            return .network
        }
    }
}
When refactoring, I've noticed that I've never tested the throwing part of the requestWeatherData function. While I am not a fan of the obsessive 100% test coverage it's good to check if the network actually can fail and what happens then. I will not get into details but if you are curious you can check the commit, I've added several tests there.
💡 Pay attention to the commit messages. Git history is a valuable source of documentation and it helps understanding motivation and the change itself. And again, the happiness index of future us goes a little upwards ✅
URL creation
What does WeatherRequester.requestWeatherData do? It
Creates URL with hardcoded parameters;
Requests data via abstraction;
Maps result via static helper.
The first point stands out. The Requester should only request the data and map it into a consumable format. But it should not decide on the URL.
There are multiple ways to organize URLs. The main criterion is that the approach should be extendable and flexible enough so we don't have to change the Requester each time URLs change. At my company, we use an approach similar to the solution below. Each endpoint is represented by an enum case and has query parameters as associated values. You can read about a similar approach in more detail in this random article I found on the internet.
protocol API {
    var urlString: String { get }
    var queryParameters: [String: CustomStringConvertible] { get }
}

extension API {
    func makeURL() -> URL {
        guard var components = URLComponents(string: urlString) else {
            fatalError("Could not construct URLComponents for \(urlString)")
        }
        components.queryItems = queryParameters.map { .init(name: $0.key, value: $0.value.description) }
        return components.url!
    }
}

enum APIs {
    enum Weather: API {
        case currentWeather(latitude: Double, longitude: Double)

        var urlString: String {
            switch self {
            case .currentWeather:
                return "https://api.open-meteo.com/v1/forecast"
            }
        }

        var queryParameters: [String: CustomStringConvertible] {
            switch self {
            case let .currentWeather(latitude, longitude):
                return ["latitude": latitude, "longitude": longitude, "current_weather": true]
            }
        }
    }
}
Neately-neat! From now on, our Requester knows what API to ask for but it has no idea how the url is formed. And it shows a good separation of responsibilities:
func requestWeatherData(latitude: Double, longitude: Double) async -> Result<WeatherData, NetworkError> {
    do {
        let request = URLRequest(url: APIs.Weather.currentWeather(latitude: latitude, longitude: longitude).makeURL())
        let (data, _) = try await httpRequester.data(for: request)
        // ...
}
You guessed it. The future us are already over the top ✅
A bit of statistics
For estimation of what one can achieve in a given timeframe. Writing and rewriting the code for this article took me around one hour. It's a fair estimation of how much time it should take to write a simple network module. It can take more. Up to ten times if you try writing an article in parallel ;) to be completely honest, for me, it took even longer. In the comments, you might discover that I started the article in June 2023 :D
Afterword
Have you made it till there? That's a solid achievement! I am always amazed by how much thought and explanation even such a tiny feature requires. And I am also amazed by people who can read such long texts till the end. You are amazing! 🚀
And, once again. There are many ways to achieve the same result, probably with a better quality. In programming, there is rarely the one right solution. But there are many incorrect ones and I hope that this article will help you avoid some common mistakes.
Till the next time when we will handle creating an arbitrary service – location! 🌊